How to...
-
How to change ownership of a topic/first post in NodeBB:
- Login to mongo and select the nodebb db:
mongo --port 27017 use nodebb- Find the object containing the title of the Topic and note down the "mainPid" value of the first post (49 in the example below):
> db.objects.find({"title":"Party"},{"content":0}).pretty(){ "_id" : ObjectId("5ce891520ff514295e68ba97"), "_key" : "topic:32", "tid" : 32, "uid" : 18, "cid" : 19, "mainPid" : "49", "title" : "Party", "slug" : "32/party", "timestamp" : 1558745426311, "lastposttime" : 1559511732448, "postcount" : 3, "viewcount" : 19, "locked" : 0, "deleted" : 0, "pinned" : 0, "thumb" : "", "teaserPid" : 72 } { "_id" : ObjectId("5cf0b04e60bb27abedd56188"), "_key" : "event:821", "type" : "post-purge", "uid" : 18, "pid" : "60", "ip" : "137.154.34.129", "tid" : 32, "title" : "Party", "timestamp" : 1559277646867, "eid" : 821 }- Find the "uid" of the user you wish to change ownership to (19 in the example below):
> db.objects.find({"username":"Harry"}).pretty(){ "_id" : ObjectId("5cf4420b60bb27abedd56383"), "_key" : "user:19", "username" : "Harry", "userslug" : "harry", "email" : "harry@harry.com", "joindate" : 1559511563818, "lastonline" : 1559512762482, "picture" : "", "fullname" : "harry_mcboatface", "location" : "", "birthday" : "", "website" : "", "signature" : "", "uploadedpicture" : "", "profileviews" : 2, "reputation" : 0, "postcount" : 3, "topiccount" : 0, "lastposttime" : 1559512083251, "banned" : 0, "status" : "online", "gdpr_consent" : 0, "acceptTos" : 0, "uid" : 19, "ldapid" : 4028644545, "rss_token" : "340dc97c-0586-4ecd-8584-2241d106ce03" }- Use the "uid" value from above (19) to update the "cid" and "uid" values of the topic
> db.objects.update({ "title":"Party" },{$set: { "cid" : 19 }}) > db.objects.update({ "title":"Party" },{$set: { "uid" : 19 }})- Use the "uid" value from above (19) to update the first post from above ("pid" 49)
> db.objects.update({ "pid": 49 },{$set: { "uid" : 19 }})- If you want to be very thorough you can update the uid of the post edit history. Find all edit 'eid' values shown after running the very first command in this post :
db.objects.find({"title":"Party"},{"content":0}).pretty()and update their uid:
db.objects.update({ "eid": 821 },{$set: { "uid" : 19 }})- You then change the uid of all posts in the topic by inspecting the html of each post for the uid in your browser (eg. in chrome on windows right-click the post and choose inspect from the pull down menu):

- Then use the following code in mongo to update the uid for that pid:
db.objects.update({ "pid": 299 },{$set: { "uid" : 19 }})- You need to rebuild and restart the database using the Admin Control Panel (ACP) for the changes to take effect.
-
How to view Microsoft Word documents online in NodeBB:
[normal link](/assets/uploads/files/1559590085004-test-word-document.docx)

[viewable link](https://view.officeapps.live.com/op/view.aspx?src=https%3A%2F%2Flinks.sharezomics.com%2Fassets%2Fuploads%2Ffiles%2F1559590085004-test-word-document.docx)
-
How to rip/copy DVD's to your hard drive:
Method 1 (NB. Had problems with out of sync voices with this one)
-
Download and install VLC media player.
-
Run VLC media player.
-
Insert DVD.
-
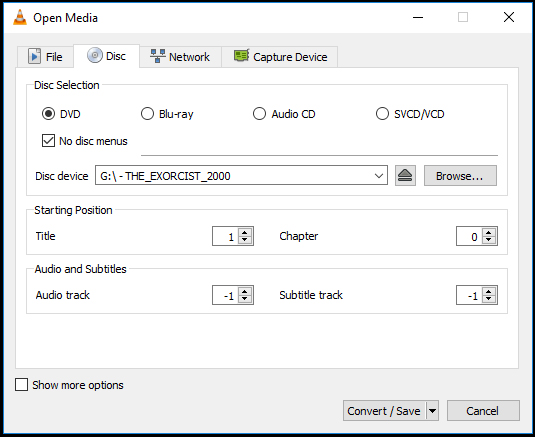
In VLC media player, click Media, and then click Convert / Save... The Open Media window opens.
-
Tick 'No disc menus' and raise the Title number to 1
-
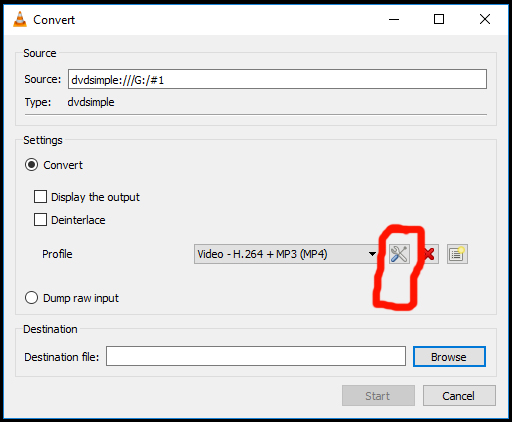
Click Convert / Save.
-
Click the additional settings button:
- Choose Ogg/Ogm encapsulation:
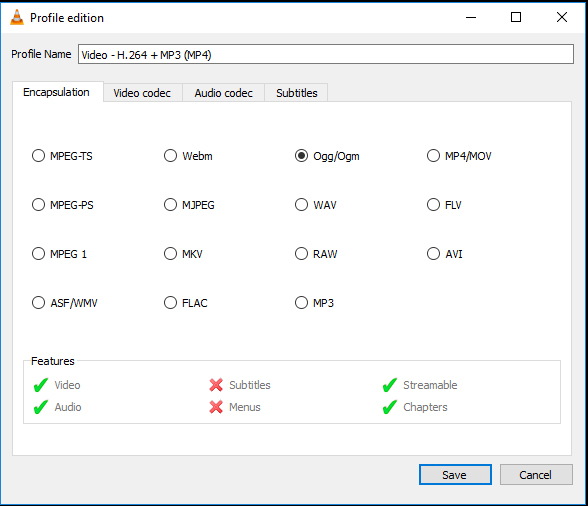
- Choose MPEG-4 Video codec:
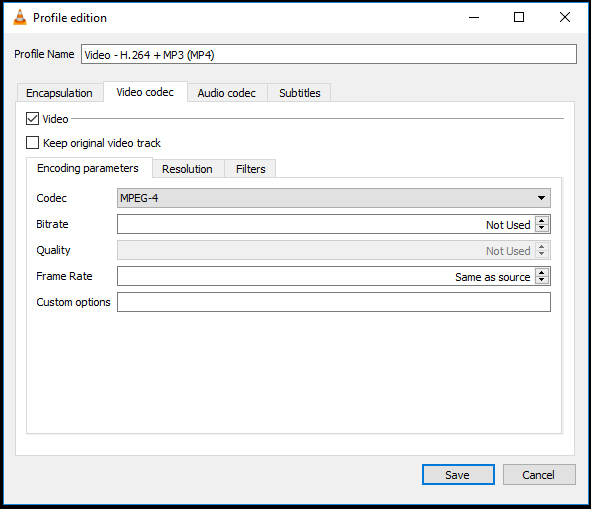
- Click save and provide a Destination file name
- Click Start
Method 2 (better)
-
Download and install adware free version of ImgBurn 2.5.8.0 from:
https://www.majorgeeks.com/files/details/imgburn.html -
Select 'Create image file from disc'
-
Right click on the *.ISO file and choose 'mount'
-
Open the VIDEO_TS.IFO file with VLC media player
-
-
How to organise NodeBB sub-categories into columns with CSS:
.category-children .category-children-item {
    float: left ;
    width: 20em ;
}
-
How to install TensorFlow with GPU support on Windows 10:
-
How to convert a docker image to a singularity image:
docker run \
  -v /var/run/docker.sock:/var/run/docker.sock \
  -v D:\host\path\where\to\output\singularity\image:/output \
  --privileged -t --rm \
  filo/docker2singularity \
  ubuntu:14.04
Replace D:\host\path\where\to\output\singularity\image with a path in the host filesystem where your Singularity image will be created. Replace ubuntu:14.04 with the docker image name you wish to convert (it will be pulled from Docker Hub if it does not exist on your host system).
You can read more and submit issues or patches at https://github.com/chrisfilo/docker2singularity
-
How to filter mapped/unmapped fastq reads:
- get all the reads where both mapped:
samtools view -F 12 bothEndsMapped.bam- get all the reads that did not map, but whose mate mapped:
samtools view -F 4 -f 8 onlyThisEndMapped.bam- get all the reads that mapped, but whose mates did not:
samtools view -F 8 -f 4 onlyThatEndMapped.bam- get all the reads where neither one mapped:
samtools view -f 12 neitherEndMapped.bam
-
How to write nodejs async/await code:
// With function declaration
async function myFn() {
  // await ...
}
// With arrow function
const myFn = async () => {
  // await ...
}
-
How to display the contents of a circular JSON object in nodejs:
Method1:
		const getCircularReplacer = () => {
		  const seen = new WeakSet();
		  return (key, value) => {
		    if (typeof value === "object" && value !== null) {
		      if (seen.has(value)) {
		        return;
		      }
		      seen.add(value);
		    }
		    return value;
		  };
		};

		var string=JSON.stringify(circularJSONobject, getCircularReplacer());
		console.log(string);
Method 2:
var util = require('util'); //a core nodejs function but it has to be imported
console.log(util.inspect(circularJSONobject));
-
How to create post buttons that look like links:
css:
  .link-button {
    background: none;
    border: none;
    color: #337ab7;
    cursor: pointer;
    font-size: 19px;
    font-weight: 400;
    font-family: 'Lato', sans-serif;
  }
  .link-button:focus {
    outline: none;
  }
  .link-button:active {
    color:red;
  }
  .link-button:hover {
    text-decoration: underline;
    filter: brightness(65%);
  }
html:
<form method="post" action="https://mics.com/index" class="inline">
<button type="submit" name="submit_name" value="name" class="link-button">link display text</button>
</form>
-
How to display line numbers for pasted code in NodeBB:
This is from here.
NB. (This isn't working for me)
Put this in your custom header (ACP -> Appearance -> Custom HTML & CSS -> Custom Header):
<script>
require(['highlight'], function (hljs) {
  require([
    'https://cdnjs.cloudflare.com/ajax/libs/highlightjs-line-numbers.js/1.1.0/highlightjs-line-numbers.min.js'
  ], function () {
    $(window).on('load action:ajaxify.end', function () {
      setTimeout(function () {
        hljs.initLineNumbersOnLoad();
      }, 100);
    });
  });
});
</script>
NB. The contents of 'highlightjs-line-numbers.min.js' are:
!function(e){"use strict";function t(){"complete"===document.readyState?n():e.addEventListener("DOMContentLoaded",n)}function n(){try{var e=document.querySelectorAll("code.hljs");for(var t in e)e.hasOwnProperty(t)&&r(e[t])}catch(n){console.error("LineNumbers error: ",n)}}function r(e){if("object"==typeof e){var t=e.parentNode,n=o(t.textContent);if(n>1){for(var r="",c=0;n>c;c++)r+=c+1+"\n";var l=document.createElement("code");l.className="hljs hljs-line-numbers",l.style["float"]="left",l.textContent=r,t.insertBefore(l,e)}}}function o(e){if(0===e.length)return 0;var t=/\r\n|\r|\n/g,n=e.match(t);return n=n?n.length:0,e[e.length-1].match(t)||(n+=1),n}"undefined"==typeof e.hljs?console.error("highlight.js not detected!"):(e.hljs.initLineNumbersOnLoad=t,e.hljs.lineNumbersBlock=r)}(window);
-
How to cycle/loop through an object in javascript:
for (var key in req.body) {
    if (key in req.body) {
        console.log(req.body[key]);
    }
}
-
%(#ffffff)[How to publish a package with npm:]
*Sign in with npm login:
npm loginYou’ll be prompted to enter your username, password, and email address.
*Create a folder named how-to-publish-to-npm:
mkdir how-to-publish-to-npm*Navigate into the folder:
cd how-to-publish-to-npm*Begin the project with the npm init command:
npm initThis command runs you through a few questions and creates a package.json file for you at the end. This package.json file contains the bare necessities you need to publish your project. (Feel free to skip questions that don’t make sense).
*The final step is to publish your package with the npm publish command:
npm publish
-
How to set permissions in linux with chmod:
chmod 600 {filespec}	You can read and write; the world can't. Good for files.
chmod 700 {filespec}	You can read, write, and execute; the world can't. Good for scripts.
chmod 644 {filespec}	You can read and write; the world can only read. Good for web pages.
chmod 640 {filespec}	You can read and write; group can read, the world can't do anything.Good for group project..
chmod 755 {filespec}	You can read, write, and execute; the world can read and execute. Good for programs you want to share, and your public_html directory.
chmod 750 {filespec}	You can read, write, and execute; the group can read and execute, the world can't do anything. Good for programs you want to share within group.
-
How to install WebODM on Windows 10 home:
- Download Docker Toolbox and install it as an administrator. (You may need to uninstall VirtualBox first.)
- Launch Docker Quickstart Terminal as an administrator. Note down the IP address shown below the whale.
## . ## ## ## == ## ## ## ## ## === /"""""""""""""""""\___/ === ~~~ {~~ ~~~~ ~~~ ~~~~ ~~~ ~ / ===- ~~~ \______ o __/ \ \ __/ \____\_______/ docker is configured to use the default machine with IP 192.168.99.100 For help getting started, check out the docs at https://docs.docker.com- Download WebODM with Git and start it:
git clone https://github.com/OpenDroneMap/WebODM --config core.autocrlf=input --depth 1 cd WebODM sh ./webodm.sh start- Navigate to port 8000 of the IP address recorded in the first step:
http://192.168.99.100:8000- It is advisable to resize the VM associated with WebODM.
cd "C:\Program Files\Oracle\VirtualBox"
./VBoxManage clonemedium disk --format VDI "C:\Users\username\.docker\machine\machines\default\disk.vmdk" "C:\Users\username\.docker\machine\machines\default\disk.vdi"

./VBoxManage modifyhd "C:\Users\username\.docker\machine\machines\default\disk.vdi" --resize 100000
After resizing you will need to use a GParted VM to resize the partitions.
- If you want to stop WebODM then use the command:
sh ./webodm.sh down- To completely stop WebODM you will have to also stop the VirtualBox VBoxHeadless process using the Windows task manager
-
How to pipe output from a shell command to Perl to a shell command within a Perl script:
$com='samtools view -h '.$infile;
my $zom='samtools view -bS - > q64converted.bam';
open(SBAM, "$com|");
open SBOUT, "|$zom";
while (<SBAM>){
	print SBOUT "$_";
}
close(SBAM);
close SBOUT;
-
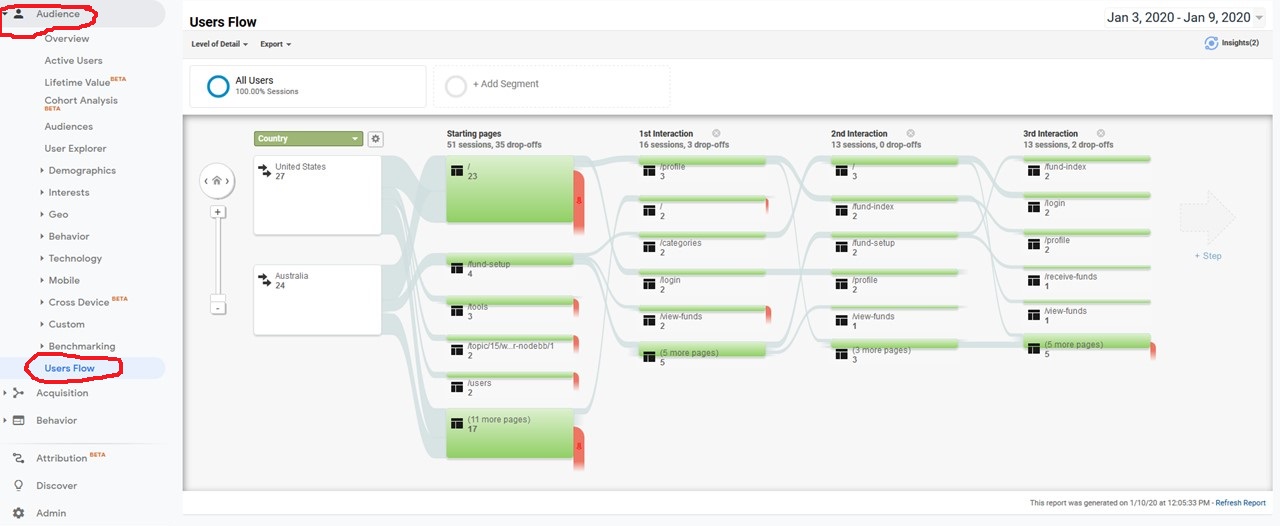
How to find out which pages are visited according to user country in Google Analytics:
-
How to horizontally split a file view in sublime text editor:
Split the view by using View -> Layout -> Rows: 2. Then select Row 1 and go to File -> New View into File. It will open second tab with the same file. Then you can drag that tab to the Row 2.
-
How to push a docker image to Docker Hub:
- You need to have an account on Docker Hub. In this example the account is named 'ning'.
- The image must be built so that the account name is within the image name
Eg. for docker command:
docker tag nextflow_docker:202004201512 ning/nextflow_docker:202004201512- For a docker-compose file:
version: '3' services: nextflow_docker: build: ./nextflow_docker image: ning/nextflow_docker:latest- Then you need to push:
docker logout
docker login
#login with your username and password (if you are on ubuntu you can ignore password keyring (agree but dont enter a password)
#NB. If you are on ubuntu and get the error message "Error calling StartServiceByName for org.freedesktop.secrets: Timeout was reached" , try the following command "sudo apt remove gnome-keyring golang-docker-credential-helpers"
docker push ning/nextflow_docker:latest
-
How to translate a singularity recipe into a Dockerfile:
- First install spython:
git clone https://www.github.com/singularityhub/singularity-cli.git cd singularity-cli python3 setup.py install- Then perform the conversion:
spython recipe /input/path/to/singularity/recipe/Singularity /output/path/to/Dockerfile