How to...
-
-
How to calibrate an XYZ Printing da Vinci 2.0 A Duo 3D-printer:

-
How to make the plastic stick to the base when 3d printing:
-
How to install point-e on Windows 11:
#in Windows Powershell note down the cuda version from this command:
nvidia-smi.exe

#look up the channel for your cuda version using this site:
#https://anaconda.org/nvidia/repo/installers?


#In Anaconda powershell:
conda update conda
conda update anaconda
conda update python
conda update --all
conda create --name point-e pip
#Now exit from the Powershell you are using and then open a new one before you activate the new "env".
conda activate point-e
#install cuda from the channel identified previously
conda install cuda --channel "nvidia/label/cuda-12.0"
#NB. there doesn't seem to be an option (yet) to use cud=12.0 in the code line below.  The line below is suggested when visiting https://pytorch.org/

conda install pytorch torchvision torchaudio pytorch-cuda=11.6 -c pytorch -c nvidia
#NB. I  found that the line below was necessary to get things to work
conda install cudatoolkit

conda install ipykernel jupyter

nvcc --version
conda install -c anaconda git
git clone https://github.com/openai/point-e.git
cd point-e
pip install -e .

jupyter notebook

#navigate to the notebook in Jupyter at:
#./point-e/point_e/examples/text2pointcloud.ipynb

#In the notebook add a cell at the beginning with the code below to test if the GPU is detectable:

import torch
print(f'PyTorch version: {torch.__version__}')
print('*'*10)
print(f'_CUDA version: ')
!nvcc --version
print('*'*10)
print(f'CUDNN version: {torch.backends.cudnn.version()}')
print(f'Available GPU devices: {torch.cuda.device_count()}')
print(f'Device Name: {torch.cuda.get_device_name()}')

#NB. I had an issue with the kernel crashing when plotting the pointclouds.
#The error in the anaconda powershell was:
#OMP: Error #15: Initializing libiomp5md.dll, but found libiomp5md.dll already initialized.
#The solution was to add a cell at the start of the script with the code:
import os
os.environ["KMP_DUPLICATE_LIB_OK"]="TRUE"
#NB. The above workaround apparently may cause crashes or silently produce incorrect results....
-
How to visualise massive point clouds in python:
https://towardsdatascience.com/guide-to-real-time-visualisation-of-massive-3d-point-clouds-in-python-ea6f00241ee0
-
How to create threaded replies in NodeBB:
-
How to negotiate a better home loan rate with your bank (from Barefoot Investor SCOTT PAPE):
You: Hello, my account number is ______. I’ve been with you for ___ years, but I’ve applied to refinance with UBank. Their rate is ____ per cent, which is a full ___ per cent cheaper than you’re charging me. Given our longstanding relationship, I’d like you to match the offer — or send me the forms I need to switch to UBank.
Bank rep: One moment, please.
(You’re bluffing, of course. However, the bank’s sales team have strict targets, backed by incentives, that they have to meet — one of which is giving profitable customers discounts to stop them leaving.)
Bank rep: We can’t match the rate you have quoted. However, we understand you are a valuable customer, so we would like to offer you a 0.15 per cent discount.
You: That’s not good enough. I’ve already got conditional approval … so in order to stay I need at least a 0.5 per cent discount. Could you please speak to your supervisor? I’m happy to wait.
Bank rep (a full six minutes later): On reviewing your case, we can offer you that 0.5 per cent discount on your current rate.
You: Brilliant! Please send me an email confirming the new rate and confirming that it will be applied as of start of business tomorrow.
-
How to fix the error "FATAL: container creation failed:" "error: can't mount image " "failed to mount squashfs filesystem: input/output error":
#This occurs when you try to run a singularity container within a VM and it is located on a mounted ntfs filesystem. The solution is to transfer the container to a different filesystem eg. ext3.
-
How to run docker-compose when you get the errors:
- File "posixpath.py", line 376, in abspath
- FileNotFoundError: [Errno 2] No such file or directory
Open a new terminal and repeat the command.
-
How to login to root account in a new ubuntu/xubuntu virtual machine that has been set up with a non-administrator account:
su
yourpasswordfortheuseraccount
-
How to update apt and install filezilla on xubuntu using a proxy:
sudo apt -o Acquire::http::proxy="http://user:password@host:port/" update
sudo apt -o Acquire::http::proxy="http://user:password@host:port/" install filezilla
-
How to install ubuntu on windows:
- Follow the instructions at:
https://s1gr1d.medium.com/how-to-set-up-linux-on-windows-with-wsl-2-debe2a64d20d
(NB. these instructions work for Windows 10 and 11 although the location of the Settings menus may differ slightly. Also note that VMX is the same as VT-X in the BIOS settings) - In Windows Powershell, you may also need to issue the following commands:
bcdedit /set hypervisorlaunchtype Auto
wsl --update
- Follow the instructions at:
-
How to use your phone as a webcam:
-
How to fix the following error in NextFlow:
WARN: Failed to render DAG file:
This error prevents NextFlow from drawing the DAG for the pipeline.
#install Graphviz
#eg. with conda
conda install -c conda-forge graphviz
-
How to gather and group all tuple elements in a NextFlow channel by the first and second indexes of each tuple, perform a process on a file containing the first and second indices, and then reform the original channel by scattering:
hc_ch = Channel.of( ['abc', 1, file('file1.txt')], ['abc', 1, file('file2.txt')], ['abc', 1, file('file3.txt')], ['def', 2, file('file4.txt')] ) combinedChannel = hc_ch.groupTuple(by: [0, 1])- Expected structure of combinedChannel:
[ ['abc', 1, [file('file1.txt'), file('file2.txt'), file('file3.txt')]],
['def', 2, [file('file4.txt')]]
]process delete_txt { input: tuple val(id), val(sub_id), val(files) from combinedChannel output: tuple val(id), val(sub_id), val(files) into processedChannel script: """ rm ${id}_${sub_id}.txt """ }- Expected structure of processedChannel:
[ ['abc', 1, [file('file1.txt'), file('file2.txt'), file('file3.txt')]],
['def', 2, [file('file4.txt')]]
]flattenedChannel = processedChannel.flatMap { id, sub_id, files -> files.collect { [id, sub_id, it] } }- Expected structure of flattenedChannel:
[ ['abc', 1, file('file1.txt')],
['abc', 1, file('file2.txt')],
['abc', 1, file('file3.txt')],
['def', 2, file('file4.txt')]
]
-
How to get the path for the folder containing a bash script within the bash script:
# Get the directory where the script resides
SCRIPT_DIR="$(cd "$(dirname "$0")" && pwd)"
echo $SCRIPTDIR
-
How to convert a minimap2 alignment to gff/gtf:
https://github.com/lh3/minimap2/issues/455
https://github.com/lh3/minimap2/files/9591008/bam2gff_fixGffread.zip
bam2gff_fixGffread.zipminimap2 -t 10 -ax splice:hq -uf ref.fa cdna.fa |/Bio/bin/samtools-1.14 view -b > minimap2.tr.bam perl bam2gff.pl -b minimap2.tr.bam -o minimap2.tr.gff -s /Bio/bin/samtools-1.14 gffread minimap2.tr.gff -T -o minimap2.tr.gtf perl fixGffread.pl -i minimap2.tr.gtf -o minimap2.tr.fix.gtfAlternative method:
#Align sequences and convert to BAM
minimap2 -ax splice --cs target.fa query.fa | samtools sort -O BAM - > alignments.bam
#Convert to BED12 using BEDtools
bedtools bamtobed -bed12 -i alignments.bam > alignments.bed
#Convert to genePred using UCSC tools
bedToGenePred alignments.bed alignments.genepred
#Convert to GTF2 using UCSC tools. genePredToGtf has additional options that might be useful in specific use cases.
genePredToGtf "file" alignments.genepred alignments.gtf
-
How to do a dotplot with minimap2:
minimap2 -DP ref.fa query.fa|miniasm/minidot - > dot.eps
-
How to interpret genome dot plots (#dotplots #genomic).

-
How to clone a public GitHub repository with VS Code and push it to a private GitHub repository.
- Make sure Git is installed
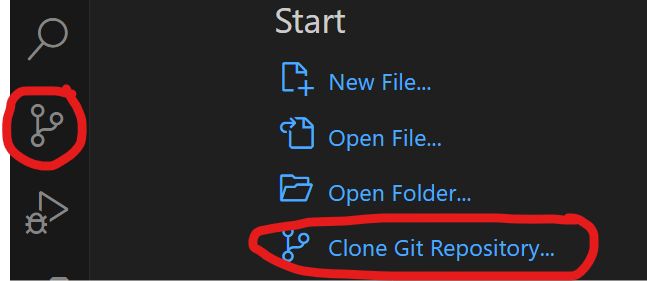
- Open VS Code and use the source control icon on the far left to clone a git repository to a local folder

Open a terminal in VS Code (View>terminal)
PS C:\Users\github> cd sarek
PS C:\Users\github\sarek> git remote remove origin
PS C:\Users\github\sarek> git remote add origin https://github.com/ink-blot/sarek.git
PS C:\Users\github\sarek> git branch
* master
PS C:\Users\github\sarek> git push -u origin master
If it doesn't promptly start pushing, an authorisation screen should (eventually) appear (it may take a few minutes).

The token method is preferred:
- Go to your GitHub account settings: GitHub Token Settings.
- Click Generate new token (classic).
- Select the scopes you need (e.g., repo for private repositories).
- Generate the token and copy it (you won’t be able to see it again later).
- In the GitHub sign-in window, switch to the Token tab.
- Paste the generated token into the input field and confirm.
Optional steps if you want to fetch updates from the original nf-core/sarek repository in the future, add it as an upstream remote:
PS C:\Users\github\sarek> git remote add upstream https://github.com/nf-core/sarek.git
PS C:\Users\github\sarek> git fetch upstream
PS C:\Users\github\sarek> git merge upstream/main