How to...
-
How to run docker-compose when you get the errors:
- File "posixpath.py", line 376, in abspath
- FileNotFoundError: [Errno 2] No such file or directory
Open a new terminal and repeat the command.
-
How to login to root account in a new ubuntu/xubuntu virtual machine that has been set up with a non-administrator account:
su
yourpasswordfortheuseraccount
-
How to update apt and install filezilla on xubuntu using a proxy:
sudo apt -o Acquire::http::proxy="http://user:password@host:port/" update
sudo apt -o Acquire::http::proxy="http://user:password@host:port/" install filezilla
-
How to install ubuntu on windows:
- Follow the instructions at:
https://s1gr1d.medium.com/how-to-set-up-linux-on-windows-with-wsl-2-debe2a64d20d
(NB. these instructions work for Windows 10 and 11 although the location of the Settings menus may differ slightly. Also note that VMX is the same as VT-X in the BIOS settings) - In Windows Powershell, you may also need to issue the following commands:
bcdedit /set hypervisorlaunchtype Auto
wsl --update
- Follow the instructions at:
-
How to use your phone as a webcam:
-
How to fix the following error in NextFlow:
WARN: Failed to render DAG file:
This error prevents NextFlow from drawing the DAG for the pipeline.
#install Graphviz
#eg. with conda
conda install -c conda-forge graphviz
-
How to gather and group all tuple elements in a NextFlow channel by the first and second indexes of each tuple, perform a process on a file containing the first and second indices, and then reform the original channel by scattering:
hc_ch = Channel.of( ['abc', 1, file('file1.txt')], ['abc', 1, file('file2.txt')], ['abc', 1, file('file3.txt')], ['def', 2, file('file4.txt')] ) combinedChannel = hc_ch.groupTuple(by: [0, 1])- Expected structure of combinedChannel:
[ ['abc', 1, [file('file1.txt'), file('file2.txt'), file('file3.txt')]],
['def', 2, [file('file4.txt')]]
]process delete_txt { input: tuple val(id), val(sub_id), val(files) from combinedChannel output: tuple val(id), val(sub_id), val(files) into processedChannel script: """ rm ${id}_${sub_id}.txt """ }- Expected structure of processedChannel:
[ ['abc', 1, [file('file1.txt'), file('file2.txt'), file('file3.txt')]],
['def', 2, [file('file4.txt')]]
]flattenedChannel = processedChannel.flatMap { id, sub_id, files -> files.collect { [id, sub_id, it] } }- Expected structure of flattenedChannel:
[ ['abc', 1, file('file1.txt')],
['abc', 1, file('file2.txt')],
['abc', 1, file('file3.txt')],
['def', 2, file('file4.txt')]
]
-
How to get the path for the folder containing a bash script within the bash script:
# Get the directory where the script resides
SCRIPT_DIR="$(cd "$(dirname "$0")" && pwd)"
echo $SCRIPTDIR
-
How to convert a minimap2 alignment to gff/gtf:
https://github.com/lh3/minimap2/issues/455
https://github.com/lh3/minimap2/files/9591008/bam2gff_fixGffread.zip
bam2gff_fixGffread.zipminimap2 -t 10 -ax splice:hq -uf ref.fa cdna.fa |/Bio/bin/samtools-1.14 view -b > minimap2.tr.bam perl bam2gff.pl -b minimap2.tr.bam -o minimap2.tr.gff -s /Bio/bin/samtools-1.14 gffread minimap2.tr.gff -T -o minimap2.tr.gtf perl fixGffread.pl -i minimap2.tr.gtf -o minimap2.tr.fix.gtfAlternative method:
#Align sequences and convert to BAM
minimap2 -ax splice --cs target.fa query.fa | samtools sort -O BAM - > alignments.bam
#Convert to BED12 using BEDtools
bedtools bamtobed -bed12 -i alignments.bam > alignments.bed
#Convert to genePred using UCSC tools
bedToGenePred alignments.bed alignments.genepred
#Convert to GTF2 using UCSC tools. genePredToGtf has additional options that might be useful in specific use cases.
genePredToGtf "file" alignments.genepred alignments.gtf
-
How to do a dotplot with minimap2:
minimap2 -DP ref.fa query.fa|miniasm/minidot - > dot.eps
-
How to interpret genome dot plots (#dotplots #genomic).

-
How to clone a public GitHub repository with VS Code and push it to a private GitHub repository.
- Make sure Git is installed
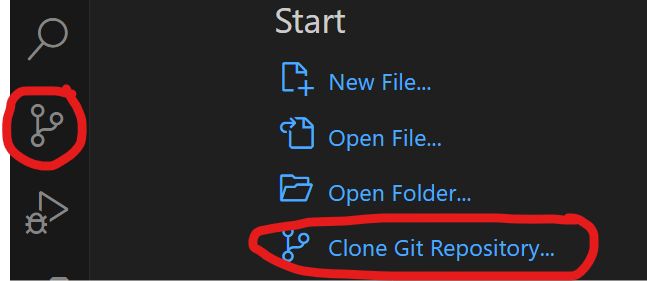
- Open VS Code and use the source control icon on the far left to clone a git repository to a local folder

Open a terminal in VS Code (View>terminal)
PS C:\Users\github> cd sarek
PS C:\Users\github\sarek> git remote remove origin
PS C:\Users\github\sarek> git remote add origin https://github.com/ink-blot/sarek.git
PS C:\Users\github\sarek> git branch
* master
PS C:\Users\github\sarek> git push -u origin master
If it doesn't promptly start pushing, an authorisation screen should (eventually) appear (it may take a few minutes).

The token method is preferred:
- Go to your GitHub account settings: GitHub Token Settings.
- Click Generate new token (classic).
- Select the scopes you need (e.g., repo for private repositories).
- Generate the token and copy it (you won’t be able to see it again later).
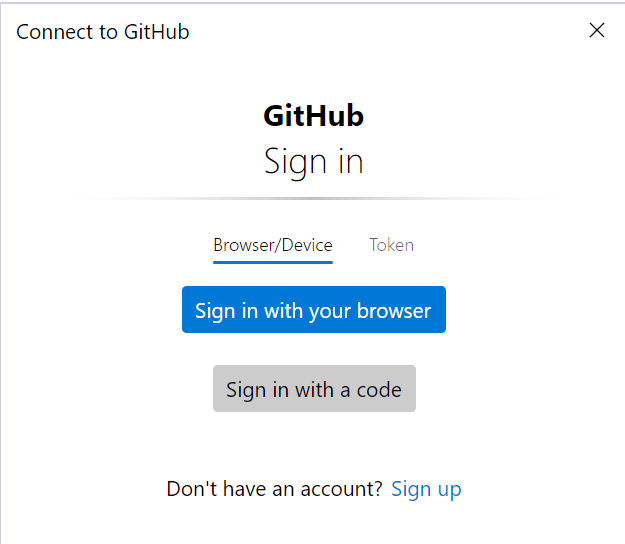
- In the GitHub sign-in window, switch to the Token tab.
- Paste the generated token into the input field and confirm.
Optional steps if you want to fetch updates from the original nf-core/sarek repository in the future, add it as an upstream remote:
PS C:\Users\github\sarek> git remote add upstream https://github.com/nf-core/sarek.git
PS C:\Users\github\sarek> git fetch upstream
PS C:\Users\github\sarek> git merge upstream/main
-
How to get rid of "WARNING : No mitochondrion chromosome found" in SnpEff:
Prefix the contig name with MT.
-
How to collect all files from one channel and associate/combine them with elements of another channel in NextFlow:
Example Input channels:
bam_for_collect_ch2:
[ file('73-50_L002.bam') ]
[ file('73-50_L001.bam') ]interval_vcfs_3:
[ file('73-50_L001_raw_variants_1.vcf.gz') ]
[ file('73-50_L001_raw_variants_2.vcf.gz') ]
[ file('73-50_L002_raw_variants_1.vcf.gz') ]
[ file('73-50_L002_raw_variants_2.vcf.gz') ]Process code:
input:
set val(pair_id), val(all_vcf) from bam_for_collect_ch2.map({ file -> file.baseName }).combine(interval_vcfs_3.collect().map({ file -> file.baseName }).toList())
Example output:
[ '73-50_L002', ['73-50_L002_raw_variants_1.vcf.gz', '73-50_L002_raw_variants_2.vcf.gz'] ]
[ '73-50_L001', ['73-50_L001_raw_variants_1.vcf.gz', '73-50_L001_raw_variants_2.vcf.gz'] ]
-
How to collect all files related by prefix in NextFlow:
Example input channel:
interval_bams_ch:
[ file('73-50_L001_raw_variants_1.bam') ]
[ file('73-50_L001_raw_variants_2.bam') ]
[ file('73-50_L002_raw_variants_1.bam') ]
[ file('73-50_L002_raw_variants_2.bam') ]Process code:
bam_name_parts_ch = interval_bams_ch.map { file ->
    def name = file.baseName.replaceFirst(/_raw_variants_.*/, '')
    tuple(name, file)
}.groupTuple()
Example output:
[ '73-50_L001', [file('73-50_L001_raw_variants_1.bam'), file('73-50_L001_raw_variants_2.bam')] ]
[ '73-50_L002', [file('73-50_L002_raw_variants_1.bam'), file('73-50_L002_raw_variants_2.bam')] ]
-
How to conditionally choose from two channels in NextFlow:
grouped_interval_vcf_ch=(params.splitIntervalOverlapLength && params.splitIntervalOverlapLength.toInteger() > 0
	? trimmed_vcf_ch
	: interval_vcfs_3
)
-
How to re-use a file channel and indeterminate number of times (eg combining with a channle with an unknkown number of elements in NextFlow DSL1:
process collectGVCF {
  publishDir "${params.combined_1_vcf}", mode: 'copy'

  output:
    set val(pair_id), val(round), file("${pair_id}_raw_variants_${round}.vcf.gz") into collected_vcf
}

// Later after splitting:
sample_files
  .map { it -> it.getBaseName() }
  .combine(Channel.fromPath("${params.combined_1_vcf}/*_raw_variants_1.vcf.gz"))
  .set { reuse_pairs }
-
How to apply for a Visa on Arrival for Indonesia online before you travel:
A Visa on Arrival (VOA) is available for passport holders in many countries including Australia. It costs US$35 (A$50) and is valid for 30 days. Follow the link below to apply.
-
How to show fold changes in an excel spreadsheet when there are 0 values in the denominator. In the example below P30 is the numerator and P2 is the denominator. The logic is:
-
Both numerator and denominator = 0 → output 0.00
-
Denominator = 0, numerator ≠ 0 → output >{numerator} (2 decimals)
-
Numerator = 0, denominator ≠ 0 → output <{denominator} (2 decimals)
-
Otherwise → output normal division with 2 decimals.
=IF(AND(P30=0,P2=0),"0.00",
   IF(P2=0,">"&TEXT(P30,"0.00"),
      IF(P30=0,"<"&TEXT(P2,"0.00"),
         TEXT(P30/P2,"0.00"))))
-
-
How to search for a file on linux and suppress error messages and stop once the first instance is found:
find /home/files -xdev -type f -name 'P13.txt' -print -quit 2>/dev/null