How to...
-
How to use caret library from R to create folds for k-fold validation:
# Import caret
library(caret)
# 10-Fold cross validation
valid_sets = createFolds(1:nrow(data), k = 10)
How to create a vector with 10 zeroes in R:
vector = numeric(length(1:10))
-
How to find the most common element in a vector in R:
mostCommon <- function(x){
     un <- unique(x)
     un[which.max(tabulate(match(x,un)))]
}
-
How to normalise data in R:
#@@@@@@@@@@@@@@@@@@@@@@@@@@@@@@@@@@@@@@@
####FUNCTION THAT CAN BE USED TO SCALE TO ANY RANGE
#@@@@@@@@@@@@@@@@@@@@@@@@@@@@@@@@@@@@@@@
#define the function
    #x is the input vector
    #y is the scale (eg. you can use eg 1:100 or c(1,100))
normaliza <- function(x,y){
  xin<-as.numeric(x)
  yin<-as.numeric(y)
  xmin<-min(xin)
  xmax<-max(xin)
  ymin<-min(yin)
  ymax<-max(yin)
  nza<-rep(0,length(xin))
  counta<-1
  for(i in xin){
    new<-(((i - xmin)/(xmax - xmin))*(ymax-ymin))+ymin
    nza[counta]<-new
    counta=counta+1
  }
  return(nza)
}

#define the scale
y<-c(0,10)

#an example with a vector:

#define a vector
test_vector<-1:100
#test the function on a vector
nzt<-normaliza(test_vector,y)
sort(nzt)

#an example with a dataframe

#define a dataframe
test_frame<-as.data.frame(cbind(test_vector,test_vector))
#test the function on a dataframe
nzt_frame <- as.data.frame(lapply(test_frame, normaliza,y=y))
nzt_frame


#@@@@@@@@@@@@@@@@@@@@@@@@@@@@@@@@@@@@@@@
#### FUNCTION THAT CAN SCALE FROM 0 to 1
#@@@@@@@@@@@@@@@@@@@@@@@@@@@@@@@@@@@@@@@

#define the function:
normalize <- function(x) {
    return ((x - min(x)) / (max(x) - min(x)))
}

#test on a data frame:
nzt_frame <- lapply(test_frame, normalize)
nzt_frame
#@@@@@@@@@@@@@@@@@@@@@@@@@@@@@@@@@@@@@@@
-
How to apply a function with multiple parameters in R:
mylist <- list(a=1,b=2,c=3)
myfxn <- function(var1,var2){
  var1*var2
}
var2 <- 2

sapply(mylist,myfxn,var2=var2)
-
How to manually scale data in R exactly the same as the base 'scale' function:
#define the data
vec1<-1:20
vec2<-21:40
vecz<-as.matrix(cbind(vec1,vec2))

#define the function
scalez <- function(q,sc){
  #if not scaling then give 0 for sc
  #you could also simplify below as:
  #return(q/sd(q))
  if(sc == 0){
    return(q/sqrt(sum(q^2)/(length(q)-1)))
  }
  else{
    #you could also simplify below as:
    #return((q-mean(q))/sd(q))
    return((q-mean(q))/(sqrt((sum((q-mean(q))^2))/(length(q)-1))))
  }
}

#test our scale function on a vector without centering
uncentered_vec1<-scalez(vec1,sc=0)
uncentered_vec1

#test our scale function on a vector with centering
centered_vec1<-scalez(vec1, sc=1)
centered_vec1

#test the base scale function on a vector without centering
scale_nocenter_vec1<-scale(vec1, center = FALSE)
scale_nocenter_vec1

#test our scale function on a matrix without centering
uncentered_vecz<-apply(vecz,2, scalez, sc=0)
uncentered_vecz

#test the base scale function on a matrix without centering
scale_nocenter_vecz<-scale(vecz, center = FALSE)
scale_nocenter_vecz

#test our scale function on a matrix with centering
centered_vecz<-apply(vecz,2, scalez, sc=1)
centered_vecz

#test the base scale function on a matrix with centering
scale_center_vecz<-scale(vecz, center = TRUE)
scale_center_vecz
-
How to do reverse scaling of scaled data in R:
#define the data
vec1<-1:20
vec2<-21:40
vecz<-as.matrix(cbind(vec1,vec2))


#######################################################################
#define the function for unscaling

unscalez <- function(z,s,c){
  if(is.vector(z)){
    #if scaling was performed with the scale function then the scaled:scale attribute will exist
    if(length(attr(z,'scaled:scale'))>0){
      #if scaling was performed with the scale function and center option then the scaled:center attribute will exist
      if(length(attr(z, 'scaled:center'))>0){
        #if centering occurred 'scaled:scale'=sd(unscaled vector)
        return((z*(attr(z, 'scaled:scale')))+attr(z, 'scaled:center'))
      }
      else{
        #if centering did not occur 'scaled:scale'=sqrt(sum(q^2)/(length(q)-1)), where q is the unscaled vector
        return(z*attr(z, 'scaled:scale'))
      }
    }
    else{
      if(length(c)>0){
        #if centering occurred s=sd(unscaled vector),c=mean(unscaled vector)
        return((z*s)+c)
      }
      else{
        #if centering did not occur, s=sqrt(sum(q^2)/(length(q)-1)), where q is the unscaled vector
        return(z*s)
      }
    }
  }
  else{
    columnz <- list()
    for(t in 1:ncol(z)){
      #if scaling was performed with the scale function then the scaled:scale attribute will exist
      if(length(attr(z,'scaled:scale'))>0){
        #if scaling was performed with the scale function and center option then the scaled:center attribute will exist
        if(length(attr(z, 'scaled:center'))>0){
          #if centering occurred 'scaled:scale'=sd(unscaled vector)
          columnz[[t]]<-(z[,t]*(attr(z, 'scaled:scale')[t]))+attr(z, 'scaled:center')[t]
        }
        else{
          #if centering did not occur 'scaled:scale'=sqrt(sum(q^2)/(length(q)-1)), where q is the unscaled vector
          columnz[[t]]<-(z[,t]*attr(z, 'scaled:scale')[t])
        }
      }
      else{
        if(length(c)>0){
          #if centering occurred s=sd(unscaled vector),c=mean(unscaled vector)
          columnz[[t]]<-((z[,t]*s[t])+c[t])
        }
        else{
          #if centering did not occur, s=sqrt(sum(q^2)/(length(q)-1)), where q is the unscaled vector
          columnz[[t]]<-(z[,t]*s[t])
        }
      }
    }
    matrixz<-do.call(cbind, columnz)
    return(matrixz)
  }
}

#######################################################################

#test the unscalez function on a vector created with the base scale function without centering
scale_nocenter_vec1<-scale(vec1, center = FALSE)
scale_nocenter_vec1
unscalez(scale_nocenter_vec1)

#test the unscalez function on a vector created with the base scale function with centering
scale_center_vec1<-scale(vec1, center = TRUE)
scale_center_vec1
unscalez(scale_center_vec1)

#test the unscalezfunction on a matrix created with the base scale function without centering
scale_nocenter_vecz<-scale(vecz, center = FALSE)
scale_nocenter_vecz
unscalez(scale_nocenter_vecz)

#test the unscalez function on a matrix created with the base scale function with centering
scale_center_vecz<-scale(vecz, center = TRUE)
scale_center_vecz
unscalez(scale_center_vecz)

#######################################################################

#test our unscalez function on a vector created with the scalez function (see previous post) without centering
uncentered_vec1<-scalez(vec1,sc=0)
uncentered_vec1
unscalez(uncentered_vec1,s=12.29035,c=NULL)

#test our unscalez function on a vector created with the scalez function (see previous post) with centering
centered_vec1<-scalez(vec1, sc=1)
centered_vec1
unscalez(centered_vec1,s=5.91608,c=10.5)

#test our unscalez function on a matrix created with the scalez function (see previous post) with centering
centered_vecz<-apply(vecz,2, scalez, sc=1)
centered_vecz
unscalez(centered_vecz,s=c(5.91608,5.916080),c=c(10.5,30.5))

#test our unscalez function on a matrix created with the scalez function (see previous post) without centering
uncentered_vecz<-apply(vecz,2, scalez, sc=0)
uncentered_vecz
unscalez(uncentered_vecz,s=c(12.29035,31.84667),c=NULL)
-
How to calculate R-squared in R:
#where x is the fitted values and y is the actual values
rsq <- function (x, y) {cor(x, y) ^ 2}

#when given the R-squared value:

adj_rsqz<- function (r,n,p) {
  1-(((1-r)*(n-1))/(n-p-1))
}
#where:
#r=r-squared value
#n=total sample size
#p=number of predictors
-
How to get all the attributes and variables associated with an object in R:
str(your_object)
-
How to continue a loop in R when there is an error for one of the elements:
  for (j in 1:10){
    tryCatch({
       print(j)
    }, error=function(e){cat("ERROR :",conditionMessage(e), "\n")})
  }
-
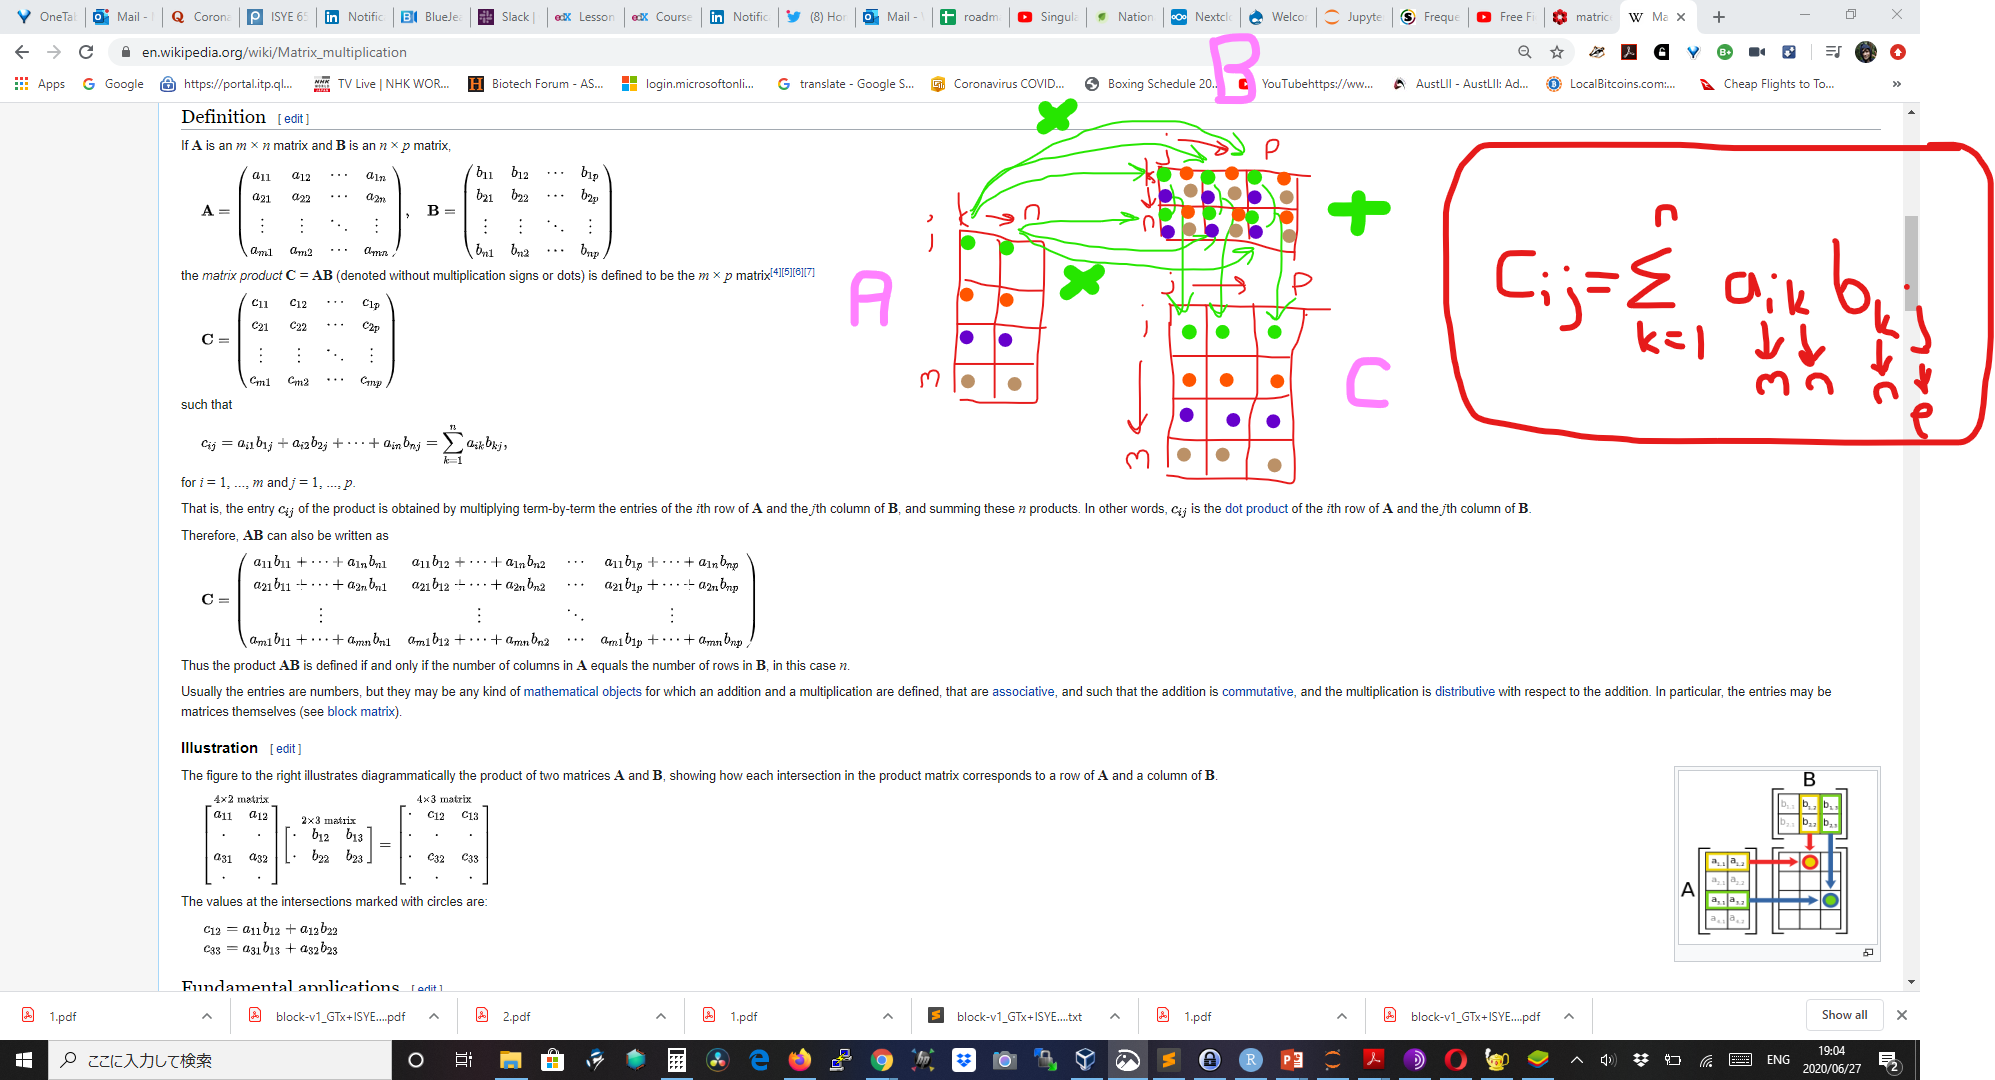
How to do matrix multiplication:

-
How to grab a still / screenshot of an image from a video in DaVinci Resolve:
-
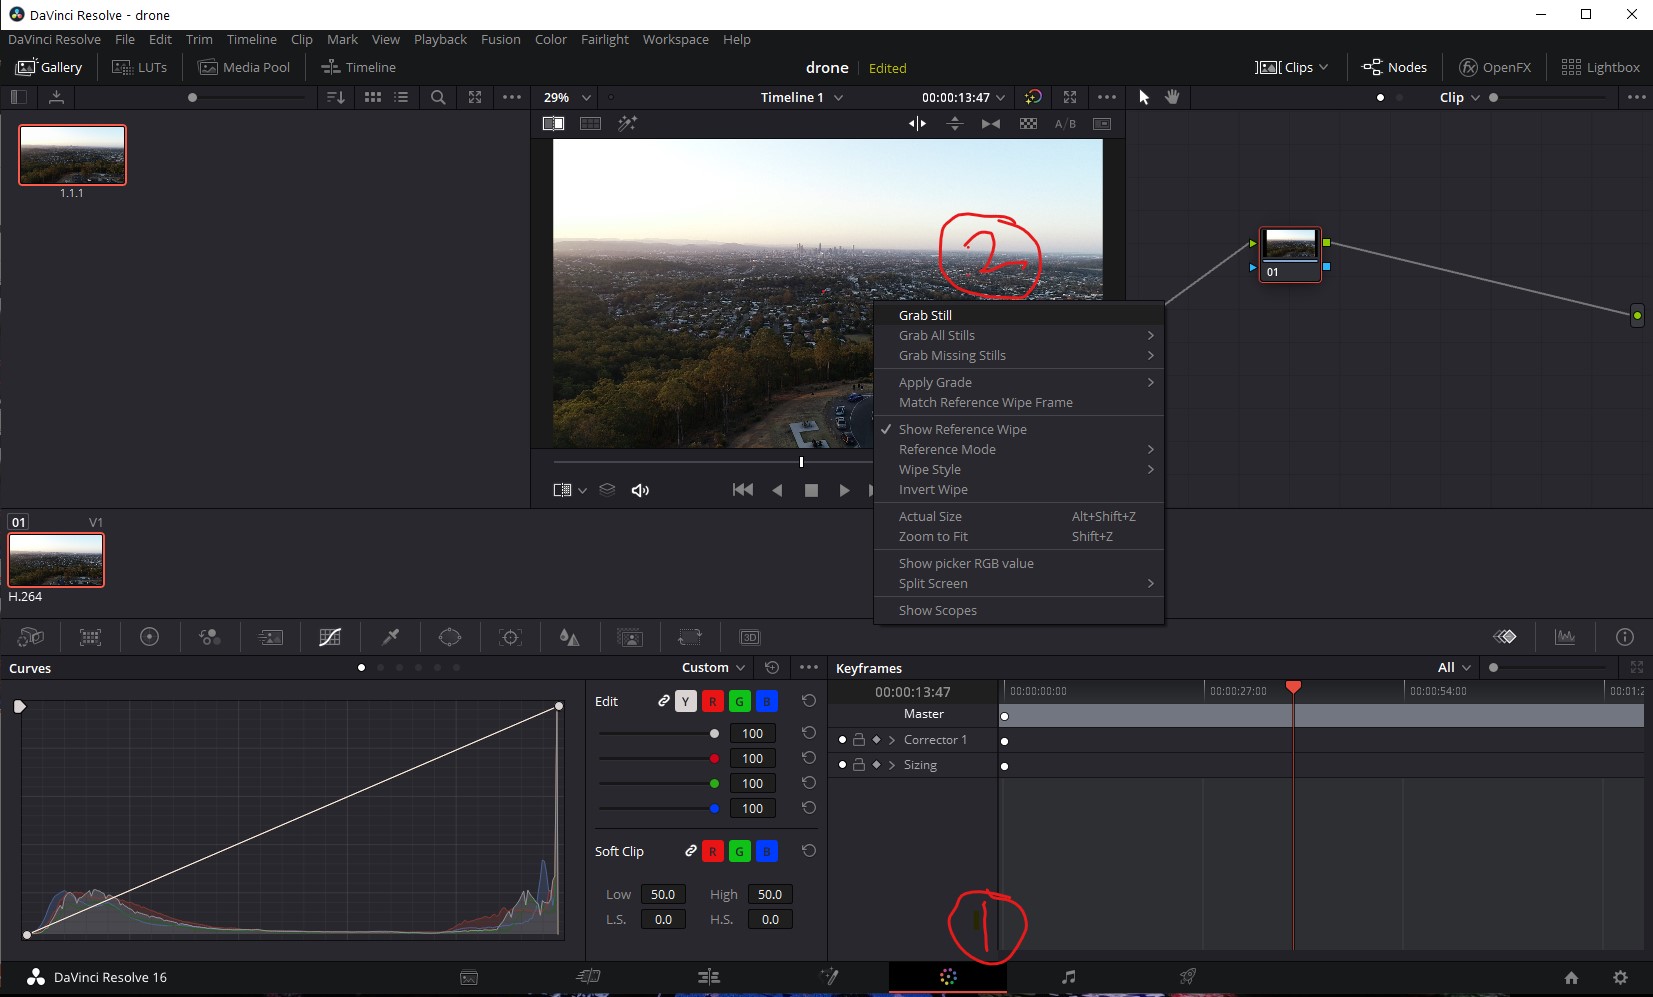
- Click on the 'picture' icon at the bottom.
-
- Right click on the image that appears at the top and select 'Grab still'.

- Right click on the image that appears at the top and select 'Grab still'.
-
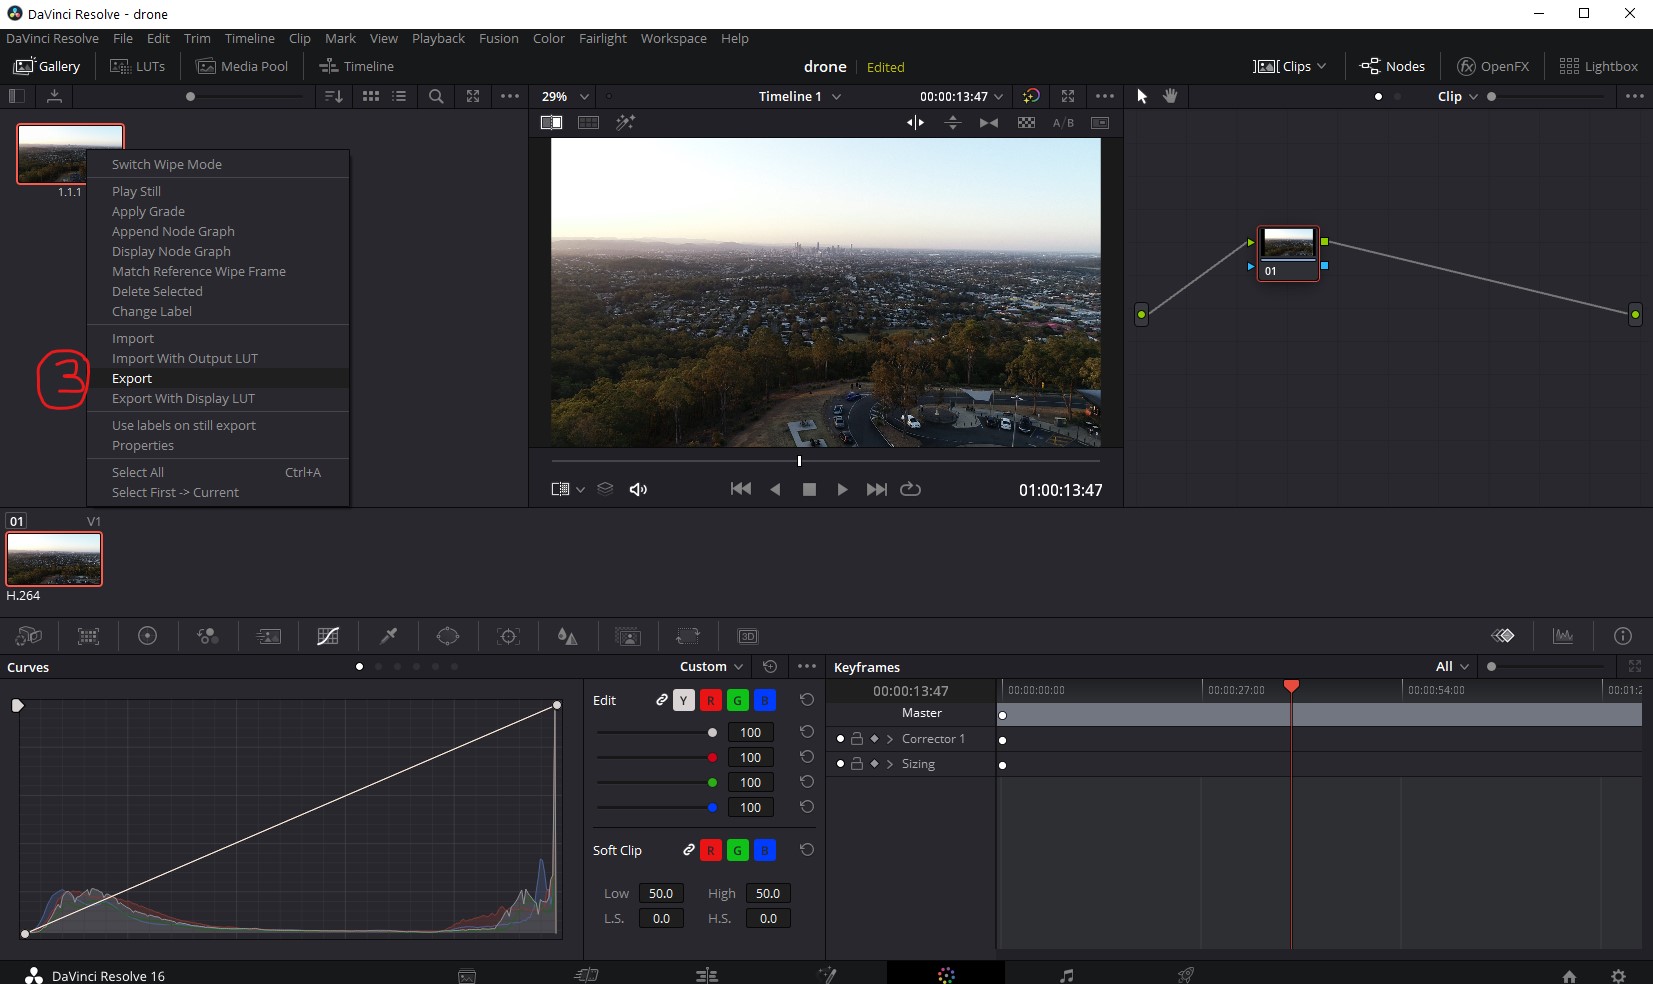
- Right click on the image that appears in the left pane and select 'Export'.

- Right click on the image that appears in the left pane and select 'Export'.
-
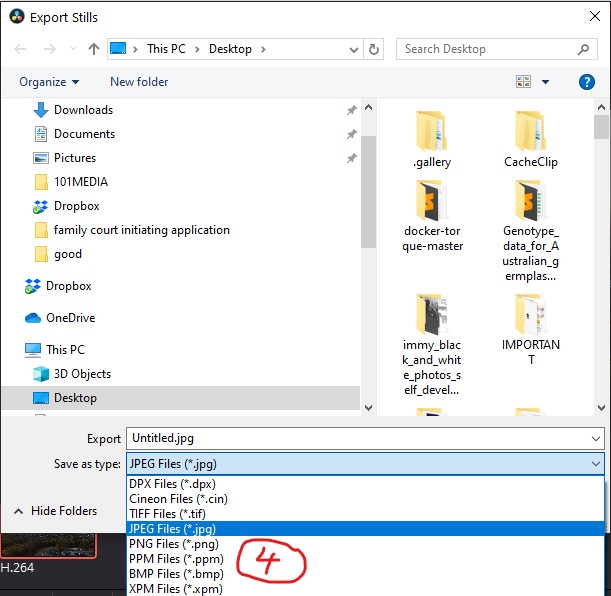
- Choose the picture format you wish to use and save.

- Choose the picture format you wish to use and save.
-
-
How to log in to a Facebook page when it gives the error:
"This page isn’t working right now www.facebook.com redirected you too many times. ERR_TOO_MANY_REDIRECTS"
- In the browsers URL type in https://www.facebook.com/home
- Select the "Go to News Feed" button
- You should now be able to browse the site
- To view your page go the bottom left "Your Shortcuts" menu option and click your listed page.
NB. You may need to clear cookies and restart the browser. I got this to work on Firefox, Chrome and Opera
-
How to insert a checked checkbox in Microsoft Word:
- Type 2611 and press 'ALT+X'
-
How to reset Soundpeats earbuds when one of them stops pairing/working:
https://www.youtube.com/watch?v=qYpDhtyy6c0
-
How to run a docker container after building it and enter it's shell:
#find the container name in the list
docker images
docker run -it /image/name bash
-
How to design KASP primers for LGC:
-
All KASP primers generally have a minimum length of 20 base pairs, some primers however may have to be longer depending on whether it meets the algorithms assay design criteria. -
We can only incorporate a maximum of 1 degenerate bases per sequence -
The recommended maximum distance between the common and reverse primers is about 80 base pairs. -
The only IUPAC codes that we can accept for assay design is M,R,W,S,Y and K
-
-
How to install tensorflow with GPU support on windows:
- Update NVIDIA driver
- Install Visual Studio https://visualstudio.microsoft.com/thank-you-downloading-visual-studio/?sku=Community&rel=16
- Restart computer
- Install cuda toolkit https://developer.nvidia.com/cuda-downloads. (NB. It's possible this step (and steps 2-3) may not be necessary. See below)
- Install Anaconda
- Go to the "Start menu" find the "Anaconda3" item and then click on the "Anaconda Powershell Prompt"
- Run:
conda update conda conda update anaconda conda update python conda update --all conda create --name tf-gpu #Now exit from the Powershell you are using and then open a new one before you activate the new "env". conda activate tf-gpu #NB. the line below appears to install cuda in addition to cudnn. Perhaps the windows installation is required to add the cuda paths. That could probably be done manually. You can manualy edit the path in Windows by typing 'path' in the start menu and selecting editing the system environmental variables. conda install -c conda-forge cudnn conda install pip pip install --upgrade pip --user pip install --upgrade tensorflow --user conda install ipykernel jupyter #below is optional conda install -c anaconda tensorboard python -m ipykernel install --user --name tf-gpu --display-name "TensorFlow2-GPU" jupyter notebook- In the Jupyter Notebook create a cell with the following contents and run to check that a GPU is listed in the physical devices:
import tensorflow as tf tf.config.list_physical_devices()- Try running the MNIST hand written digits example in a Jupyter notebook as described at https://www.pugetsystems.com/labs/hpc/How-to-Install-TensorFlow-with-GPU-Support-on-Windows-10-Without-Installing-CUDA-UPDATED-1419/
-
How to download a large text file in chrome without opening it first:
- hold down 'alt' and click the link
-
-
How to install ffmpeg on Windows
how to use apple magic trackpad 2 on windows 10 NB You sometimes need to plug it in to the laptop using the cable first and then unplug it (leave it switched on) before it can become visible in bluetooth devices (wait a while).